Beginning Maker Techniques and Technology
A PCC Winter 2019 course for students of the Opening Doors Project.
Instructor: Jordan Laurent
Email: jordan.laurent@pcc.edu
Week 1: Jan 7-11
Week 2: Jan 14-18
Week 3: Jan 22-25
Week 4: Jan 28-Feb 1
Week 5: Feb 4-8
Week 7-8: Feb 18-Mar 1
Week 9-10: Mar 4-15
Week 3: January 22-25, 2019
We will continue our discussion on coding from last week, incorporating simple analog and digital inputs into our Arduino projects. If you’re still working through the SparkFun tutorials from Week 2, those can be found by scrolling down the page here. If you’d like to learn a little more about the structure of Arduino code, look below.
Arduino, the Language
When we discuss Arduino in this course, it’s important to remember that Arduino can refer to any one of the following:
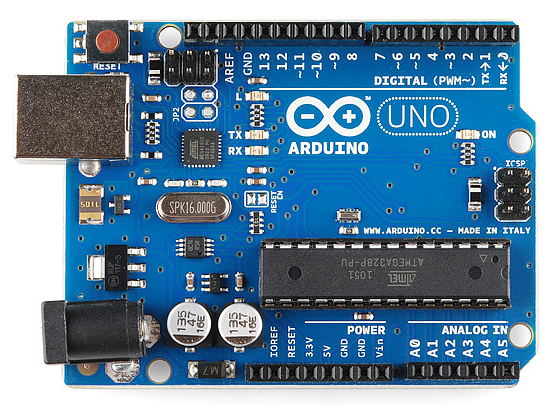
- Arduino the Microcontroller (Hardware)
- Arduino the Program (Software)
- Arduino the Language(based on the C++ coding language)
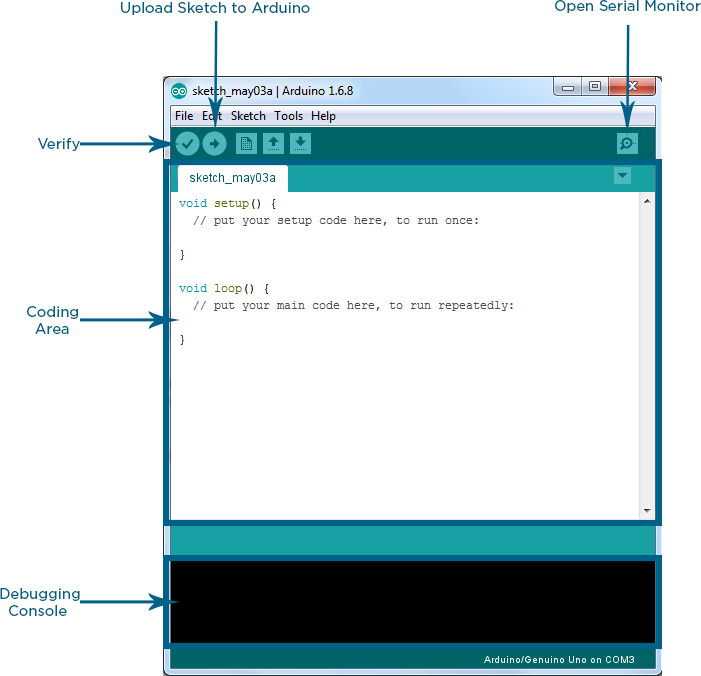
The distinction is based on the context. During the last two weeks, we’ve focused on the Arduino microcontroller when building circuits; this week, we will be learning how to better manipulate the Arduino program (also called the IDE, or Integrated Development Environment) and the Arduino language, our human-like high-level language that gets compiled (translated to machine language) by the IDE.
Since we’ve already done some coding of our own, let’s begin with an important lesson by examining the block of code used in our simple 2-LED circuit.
int led1 = 13;
int led2 = 12;

void setup() {
  pinMode(led1, OUTPUT);
  pinMode(led2, OUTPUT);
}

void loop() {
  digitalWrite(led1, HIGH);
  digitalWrite(led2, HIGH);
  delay(1000);
  digitalWrite(led1, LOW);
  digitalWrite(led2, LOW);
  delay(1000);
}
Don’t be worried if this doesn’t make immediate sense to you. While this code uses a human-like language to give instructions to the computer, it fails to resemble our language enough to translate to a non-programmer; so how are we supposed to learn to write and decipher our own code? While some basic programming can be accomplished using simple copy-paste methods and trial-and-error, a less frustrating practice among coders is to include comments - lines of non-code that can be ignored by the computer. In the Arduino and C++ languages, these are denoted by two forward-slashes, or //. Let’s look at the same code including comments.
// Declare our variables
int led1 = 13;  // LED 1 attached to pin 13
int led2 = 12;  // LED 2 attached to pin 12

// Put code in setup to run one time when the Arduino is powered on or reset
void setup() {
  pinMode(led1, OUTPUT);  // Set LED 1 as an OUTPUT
  pinMode(led2, OUTPUT);  // Set LED 2 as an OUTPUT
}

// Put code in loop to run continuously, as long as the Arduino is powered on
void loop() {
  digitalWrite(led1, HIGH);   // Turn ON LED 1 at full brightness
  digitalWrite(led2, HIGH);   // Turn ON LED 2 at full brightness
  delay(1000);                // Wait 1000 milliseconds (1 second)
  digitalWrite(led1, LOW);    // Turn OFF LED 1
  digitalWrite(led2, LOW);    // Turn OFF LED 2
  delay(1000);                // Wait 1000 milliseconds (1 second)
}
Much better! We can now see what each line of code is doing, giving us the option to pick-and-choose what lines of code we need for our own sketches. Because code can often be messy and difficult-to-understand, comments are as vital to experienced programmers as beginners - so be sure to include comments in your own code even if you think you won’t forget what that code means. You’ll thank yourself later.
The next section dives deep into the nitty-gritty of an Arduino sketch. If you’re feeling comfortable reading the code above, you can skip ahead to a review of definitions on the Resources page. Otherwise, read on.
Building Blocks
When working in the Arduino IDE, we refer to new files as sketches. Each time you open a new sketch, you’ll be greeted by the following lines of code:
void setup() {
  // put your setup code here, to run once:

}

void loop() {
  // put your main code here, to run repeatedly:

}
What does this tell us? And what do the words “void,” “setup,” and “loop” have to do with anything? Let’s start by breaking it into two parts.
void setup(){
  // put your setup code here, to run once:

}
When coding, there will often be little included in the default file. What Arduino gives us as a starting point are two functions, discussed below, and comments, indicated by the ”//” marks. A comment in code is ignored by the computer, but provides a human user with a better understanding of what a line of code means.
Our comment, then, indicates the purpose of void setup() - one of two primary functions in an Arduino sketch. Functions are blocks of code that do something, to put it simply - and what that something is can be vague or confusing without comments. Functions in code are easily identified by a word followed by two parentheses, as you see in both setup() and loop(). void setup() is the name of our function that runs one time each time you upload code to the Arduino, reset it, or simply provide the power it needs to turn on. This is a great place for code that only has to happen once, like turning on an LED to indicate that your project is turned on.
The placements of these comments is as important as their message. On either side of the comments, you’ll see what are called curly brackets, or { }; everything between those two curly brackets indicate where lines of code will be executed and in what order. Misplaced or entirely missing curly brackets are a common error in code, so make sure to check your functions for both an opening ( { ) and closing ( } ) bracket.
Using what we just learned, let’s examine the other function: void loop().
void loop() {
  // put your main code here, to run repeatedly:

}
What this function performs may be a little less clear unless we understand that computers are used as a way to automate the process of doing mundane tasks - repeatedly, often hundreds or thousands of times per second. void loop() is a function that runs a block of code as fast as possible, unless otherwise noted by the user. If you want to turn an LED on and off many times a second or perform a mathematical equation (like counting seconds), void loop() is the place to do that.
So that leaves “void”, the prefix attached to our functions. “void” is one of many return types that we’ll be discussing in the future - for now, it’s only important to understand that a return type is a type of data, and “void” means nothing - so a “void” function can be blank.
Line-by-Line: The Blink Sketch
To see these functions in action, let’s look at the very first example that we explored in this course: the Blink sketch.
int led = 13;

// the setup routine runs once when you press reset:
void setup() {
  // initialize the digital pin as an output.
  pinMode(led, OUTPUT);
}

// the loop routine runs over and over again forever:
void loop() {
  digitalWrite(led, HIGH);   // turn the LED on (HIGH is the voltage level)
  delay(1000);               // wait for a second
  digitalWrite(led, LOW);    // turn the LED off by making the voltage LOW
  delay(1000);               // wait for a second
}
If you’re reading carefully, you’ll see that this block of code begins a little differently than our blank sketch from above.
int led = 13;
This sketch starts with what’s called a declaration: the assignment of a variable (in this case, “led”) to the number 13, an integer (or “int” for short). This statement tells the computer that the word led is important - and that, for the sake of its own understanding, the computer can replace the word “led” with the integer “13.” If that doesn’t quite make sense, that’s okay - just remember that human-like instructions have to be translated to machine language somehow, and that declaring a variable can make our code more legible to humans while remaining decipherable to a computer.
It’s important to note that this line - and every line of code that we type in the Arduino language - must end with a semicolon, or ” ; “. This tells the computer that an instruction is complete and to move on to the next instruction.
// the setup routine runs once when you press reset:
void setup() {
  // initialize the digital pin as an output.
  pinMode(led, OUTPUT);
}
In our void setup() block, we see a comment that mentions yet again that this will run once when pressing reset; this includes the first upload and any time you plug the Arduino into a power source. Our next line may seem odd, but it’s our first line of code that is very particular to the Arduino language.
pinMode(led, OUTPUT);
pinMode(__, __) is a function that, unlike setup() and loop(), needs two special arguments - left blank to be filled in based on our component and its state of sending or receiving data (INPUT or OUTPUT). What pinMode(led, OUTPUT) indicates is simply that our LED - which is attached to pin 13, as noted above - is an OUTPUT.
// the loop routine runs over and over again forever:
void loop() {
  digitalWrite(led, HIGH);   // turn the LED on (HIGH is the voltage level)
  delay(1000);               // wait for a second
  digitalWrite(led, LOW);    // turn the LED off by making the voltage LOW
  delay(1000);               // wait for a second
}
void loop() contains two more functions: digitalWrite(led, HIGH/LOW) and delay(1000). These functions, like pinMode() above, contain arguments that are necessary to their operation - but these arguments can change from line-to-line, as we see with digitalWrite(led, HIGH) and digitalWrite(led, LOW). Reading the comments off to the side, we can see that the argument led is referring to our LED on pin 13, and HIGH and LOW refer to voltage values - these are also ON and OFF, respectively, or 1 and 0. So when digitalWrite(__, __) is called, we give it two arguments: one variable (such as our LED) and a state of HIGH or LOW.
Similarly, delay(____) utilizes an argument that tells the computer to wait a certain number of milliseconds before moving on to the next instruction. 1000 milliseconds is equal to a single second, as noted in the comments beside the code. If you want your LED to blink faster or slower, simply change the number of milliseconds in the delay argument.
Altogether, what this code does is fairly simple: turning an LED on and off at a consistent rate of exactly 1 second. While this may not seem like much, it is a simple introduction to how we use computers to automate a menial task like changing the color of an LED bulb many times a second, such as in a television set, or going outside to check the temperature every few minutes when we can use a component to keep checking in real time.
| ← Previous Week | Next Week → |